Round Glitter Cut Crease - Soft Romantic Makeup
Happy Valentine's Day!!! Do you celebrate this holiday with your significant other or by yourself? If yes, what how do you celebrate it? Do you have an annual tradition that makes this day special for you (even if it is buying chocolate for yourself)?
I personally don't celebrate Valentine's day, but growing up February 14th was always a big day in our household - because my sister was born on this day! Today isn't an exception - although we are not together physically today, my sister is still having a big birthday party at her place celebrating her special day and I virtually joined her and the guests for a little bit. Happy Birthday, big Sis! I am so blessed to have you in my life. Since our age difference is relatively big, I remember how she would take care of me, teach me many things, help me in many ways and always be there when I needed her. May God grant you the best, always protect you and fill your life with happiness and joy. I love you.
Today is Valentine's day. But don't wait for a special day to tell your loved ones (be it your parents or your partner) how much you love and appreciate them. Remind them about it as often as you can. Love is such a powerful feeling and by giving it you get back even more.
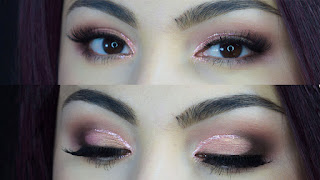
For those of you who are planning a special dinner tonight and haven't finalized their look yet, I decided to publish this post to share this soft romantic makeup idea for Valentine's day. It is a round cut crease look with light touch of glitter, which isn't difficult to recreate and looks beautiful.

I personally don't celebrate Valentine's day, but growing up February 14th was always a big day in our household - because my sister was born on this day! Today isn't an exception - although we are not together physically today, my sister is still having a big birthday party at her place celebrating her special day and I virtually joined her and the guests for a little bit. Happy Birthday, big Sis! I am so blessed to have you in my life. Since our age difference is relatively big, I remember how she would take care of me, teach me many things, help me in many ways and always be there when I needed her. May God grant you the best, always protect you and fill your life with happiness and joy. I love you.
Today is Valentine's day. But don't wait for a special day to tell your loved ones (be it your parents or your partner) how much you love and appreciate them. Remind them about it as often as you can. Love is such a powerful feeling and by giving it you get back even more.
For those of you who are planning a special dinner tonight and haven't finalized their look yet, I decided to publish this post to share this soft romantic makeup idea for Valentine's day. It is a round cut crease look with light touch of glitter, which isn't difficult to recreate and looks beautiful.

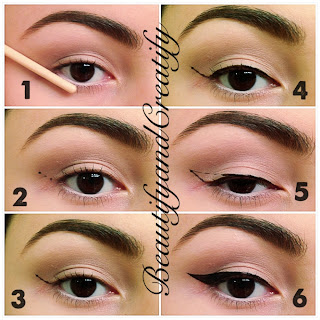
After the I got myself a camera with video feature, I find it much more useful to do a video tutorial than a pictorial. Don't you agree? Because I feel like with the video, you can accurately see the color placement, movement of brushes, application techniques and all the details. However, if you think otherwise, and would rather see a step by step photos, I can do that too. Just let me know, either in the comments or on any of my social media. For now, here is a full tutorial of this simple glam makeup:
Short Products List:
FACE:
- Dermalogica Hydrablur Primer
- Motives Color Correction quads
- Motives mineral foundation and Tarte Amazonian clay foundation mixed together
- Derma E Skin, hair and nails oil
- Milani pressed powders
- Benefit Hoola bronzer
- NYX ombre blush
- Milani Highlighter
- This is Feel "refreshed" face mist
EYES:
- Colourpop cosmetics pressed eyeshadows in Cloud 9, Stay Golden, Criss Cross, Come and Get it
- Tarte Amazonian clay duo gel liner
- Eyemimocosmetics false lashes in natural
- Motives gem sparkles in morganite
LIPS:
- Pop beauty lip stain
- Motives cosmetics gloss in soho pink
And here is how the full face looks when all the products above are combined:

It was the first time for me to use Colourpop pressed eyeshadows and let me tell you, it never disappoints! For the price range you are paying, you are getting awesome quality product which is super pigmented, easily blendable and have great texture. I always loved Colourpop products and include them in my makeup routine ever since they have launched (or even few weeks earlier than that, since I was fortunate enough to be selected to try out the products before their launch).
Another new product for me in the tutorial was Pop Beauty lip stain, which unfortunately did not impress me much. The idea and packaging is pretty cool, it looks and feels just like marker. However, it also stays on just like marker too, by that I mean, washable marker. I wore this lip stain past weekend, and within an hour it was already gone from my lips. Perhaps, I was expecting a lot from it, since it was labeled as "stain"? However, it did not stain my lips at all, by the way.
I loved the last touch of glitter liner I added, I think it accentuated the cut crease and made the look more festive. Also, I really like those magical sparkles in Motives lip gloss. What is your favorite part about this look?
I want to get this post up as soon as possible before the day is over, so let me end it here, so it can finally be available for you to read. I'll talk to you really soon in my next post. Until then, stay blessed! xoxo


Comments
Post a Comment